Jumat, 28 Juni 2013

tugas PKG 5 : Pembuatan 4 Kubus Dengan Fungsi Translasi Rotasi & Transformasi (TRT) Yang Dapat Bergerak

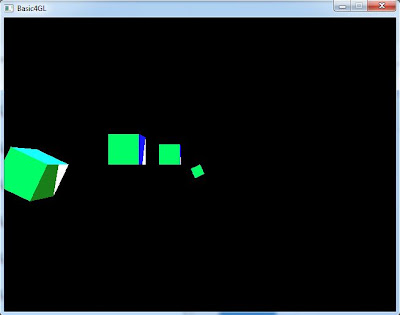
Postingan kali ini tentang Tugas 5 PKG Pembuatan 4 Kubus Dengan Fungsi Translasi Rotasi & Transformasi (TRT) Yang Dapat Bergerak, tetapi dalam tugas kami kali ini kami membuatnya melalui aplikasi Basic4GL, Berikut Dibawah ini untuk selengkapnya :


dim tx#: tx#=0
dim ty#: ty#=0
dim rb#: rb#=0 
dim x#: x#=0
dim y#: y#=0
dim z#: z#=0
dim r#: r#=0 
dim key$
    
    sub kotak (l1#)
        glbegin(GL_QUADS) 
        'depan  
        glcolor3f(0,1,0.4)
        glvertex3f(0,0,0) 
        glvertex3f(l1#,0,0)
        glvertex3f(l1#,l1#,0)
        glvertex3f(0,l1#,0)
          
        'bawah
    glcolor3f(0.1,1,1)
    glvertex3f(0,0,0) 'A
    glvertex3f(l1#,0,0) 'B
    glvertex3f(l1#,0,-l1#)  'F
    glvertex3f(0,0,-l1#) 'E

    'belakang
    glcolor3f(1,1,1)
    glvertex3f(l1#,0,-l1#)  'F
    glvertex3f(0,0,-l1#) 'E
    glvertex3f(0,l1#,-l1#) 'H
    glvertex3f(l1#,l1#,-l1#) 'G
  
    'atas
    glcolor3f(1,0.1,1)
    glvertex3f(0,l1#,-l1#) 'H
    glvertex3f(l1#,l1#,-l1#) 'G
    glvertex3f(l1#,l1#,0)  'C
    glvertex3f(0,l1#/2,0) 'D

    'kanan
    glcolor3f(0.1,0.1,1)
    glvertex3f(l1#,0,0) 'B
    glvertex3f(l1#,0,-l1#/2)  'F
    glvertex3f(l1#,l1#,-l1#) 'G
    glvertex3f(l1#,l1#,0)  'C
   
    'kiri
    glcolor3f(0.1,0.5,0.1)
    glvertex3f(0,0,0) 'A
    glvertex3f(0,0,-l1#/2) 'E
    glvertex3f(0,l1#,-l1#) 'H
    glvertex3f(0,l1#,0) 'D


         glEnd()
  end sub
   
    dim d1#
    d1#=0

           while true 
     glClear(GL_COLOR_BUFFER_BIT or GL_DEPTH_BUFFER_BIT)    ' Clear screen and depth buffer
     'Matrix View Point
     glLoadIdentity()                               ' Reset the current modelview matrix
     glTranslatef(0,0.0,-250.0)             ' Move left 1.5 units and into the screen 6.0
     rb# = rb# + 2      
     glrotatef(r#,x#,y#,z#)

    gltranslatef(tx#,ty#,0)
    
    if tx# > 230 then
        tx# = -230
    elseif tx# < -230 then
        tx# = 230    
    elseif ty# > 120 then
        ty# = -120 
    elseif ty# < -120 then
        ty# = 120
    endif

          glpushmatrix()
        d1#=d1#-0.1
        glrotatef(-d1#,0,0,1)
        'glTranslatef()
        kotak  (10)
      glpopmatrix()
     glTranslatef(-40,0.0,0.0)             
     'glrotatef(d1#,0,0,1)
     kotak (20)   
     
     glTranslatef(-50,0.0,0.0)             
     'glrotatef(d1#,0,0,1)
     kotak (30)   
     
     glTranslatef(-60,0.0,0.0)             
     glrotatef(d1#,0,0,1)
     kotak (40)
        
        SwapBuffers ()
        key$ = Inkey$ () 
    if key$ = "R" or key$ = "r" then 
        tx#=0: ty#=0: rb#=0: x#=0: y#=0: z#=0: r#=0
    endif
    if key$ = "X" or key$ = "x" then 
        if x# = 0 then
            x#=1
        else
            x#=0
        endif
    endif 
    if key$ = "Y" or key$ = "y" then 
        if y# = 0 then
            y#=1
        else
            y#=0
        endif
    endif 
    if key$ = "Z" or key$ = "z" then 
        if z# = 0 then
            z#=1
        else
            z#=0
        endif
    endif
    
    if ScanKeyDown (VK_PRIOR) then
        r# = r# - 0.1
    endif
    if ScanKeyDown (VK_NEXT) then
        r# = r# + 0.1
    endif
    if ScanKeyDown (VK_UP) then                           
        ty# = ty# + 0.1
    endif
    if ScanKeyDown (VK_DOWN) then
        ty# = ty# - 0.1
    endif
    if ScanKeyDown (VK_RIGHT) then
        tx# = tx# + 0.1
    endif
    if ScanKeyDown (VK_LEFT) then
        tx# = tx# - 0.1
    endif

              wend


Nah seperti itulah project yang kami buat, dan sekiranya ada yang kurang sempurna ataupun salah kami harap dapat dimaklumi, karena kami sendiri juga masih dalam tahap pembelajaran , dan jika anda mau mendownload file source code project diatas sebagai bahan referensi pembelajaran, anda dapat mendownloadnya dengan link di bawah ini :


ini source codenya : Download


Tugas PKG 2 : membuat garis sret titik,dan garis sret yang di buat di buat dari pixel (GL_poin) dengan mengunakan algoritma bresenham

Postingan kali ini tentang tugas 2 PKG Membuat Garis > Sret Titik, dan Garis Sret Yang Dibuat Dari Pixel Titik (GL_POINTS) Dengan Menggunakan Algoritma Bresenham, tetapi dalam tugas kami kali ini kami membuatnya melalui aplikasi C++, Berikut Dibawah ini untuk selengkapnya :


#include <windows.h>
#include <stdio.h>
#include <stdlib.h>
#include <string.h>
#include <stdarg.h>
#include <glut.h>
#include <math.h>

void layar(void)
{
glClearColor (0.0 ,0.0, 0.0, 0.0);
glMatrixMode (GL_PROJECTION);
gluOrtho2D (0.0, 300.0, 0.0, 300.0);
}

void titik (int x, int y)
{
glBegin(GL_POINTS);
glVertex2f (x, y);
glEnd();
glFlush();
}

void bresenham(int x1, int y1, int x2, int y2)
{
 int dy = y2 - y1;
 int dx = x2 - x1;
 int stepx, stepy;

 if(dy < 0) {
 dy = -dy; stepy = -1;
 }
 else {
 stepy = 1;
 }

 if(dx < 0) {
 dx = -dx;
 stepx = -1;
 }
 else {
 stepx = 1;
 }
 dy <<= 1;
 dx <<= 1;

 titik(x1,y1);
 if (dx > dy){
 int fraction = dy - (dx >> 1);
 while (x1 != x2){
 if(fraction >= 0){
 y1 += stepy;
 fraction -= dx;
 }
 x1 += stepx;
 fraction += dy;
 titik(x1,y1);
 }
 }
 else {
 int fraction = dx - (dy >> 1);
 while (y1 != y2){
 if(fraction >= 0){
 x1 += stepx;
 fraction -= dy;
 }
 y1 += stepy;
 fraction += dx;
 titik(x1,y1);
 }
 }
}

void Garisku(void)
{
glClear (GL_COLOR_BUFFER_BIT);

glColor3f (1.0, 1.0, 1.0);
glPointSize (2.0);
//Garis Lurus
bresenham (10, 10, 165, 10);
//Garis Titik Sret Bawah
bresenham (10, 20, 20, 20);
bresenham (25, 20, 25, 20);
bresenham (30, 20, 40, 20);
bresenham (45, 20, 45, 20);
bresenham (50, 20, 60, 20);
bresenham (65, 20, 65, 20);
bresenham (70, 20, 80, 20);
bresenham (85, 20, 85, 20);
bresenham (90, 20, 100, 20);
bresenham (105, 20, 105, 20);
bresenham (110, 20, 120, 20);
bresenham (125, 20, 125, 20);
bresenham (130, 20, 140, 20);
bresenham (145, 20, 145, 20);
bresenham (150, 20, 160, 20);
//Garis Titik Sret Atas
bresenham (10, 100, 20, 95);
bresenham (25, 92, 25, 92);
bresenham (30, 90, 40, 85);
bresenham (45, 82, 45, 82);
bresenham (50, 80, 60, 75);
bresenham (65, 72, 65, 72);
bresenham (70, 70, 80, 65);
bresenham (85, 62, 85, 62);
bresenham (90, 60, 100, 55);
bresenham (105, 52, 105, 52);
bresenham (110, 50, 120, 45);
bresenham (125, 42, 125, 42);
bresenham (130, 40, 140, 35);
bresenham (145, 32, 145, 32);
bresenham (150, 30, 160, 25);
bresenham (165, 20, 165, 20);
}

int main (int argc, char** argv)
{
glutInit (&argc, argv);
glutInitDisplayMode (GLUT_SINGLE | GLUT_RGB);
glutInitWindowSize (640, 420);
glutInitWindowPosition (0, 0);
glutCreateWindow ("Tugas Algoritma Bresenham");
layar();
glutDisplayFunc (Garisku);
glutMainLoop();
return 0;
}


 Nah seperti itulah project yang kami buat, dan sekiranya ada yang kurang sempurna ataupun salah kami harap dapat dimaklumi, karena kami sendiri juga masih dalam tahap pembelajaran , dan jika anda mau mendownload file source code project diatas sebagai bahan referensi pembelajaran, anda dapat mendownloadnya dengan link di bawah ini :

ini source codenya : download


Tugas PKG 4 :membuat lingkaran yang berawal dari pixel titik (GL_POIN)

di sini kami kelompok 3 akan memposttingkan tugas pkg 4 dimana membuat lingkara yang berawal dari pixel titik (GL_POIN) dimana dengan menggunakan basic4GL


                                  Berikut Untuk Source Codenya dengan mengunakan basic4GL


glMatrixMode(gl_Projection)
glPushMatrix()
glLoadIdentity()
glOrtho(0,WindowWidth(),WindowHeight(),0,-1,1)
glMatrixMode(gl_ModelView)
glPushMatrix()
glLoadIdentity()
glDisable(gl_depth_test)

dim Angle#
dim Radius#
dim CircleX#
dim CircleY#
dim X#
dim Y#

CircleX#=300
CircleY#=250
Radius#=100

for Angle# = 1 to 380
X# = CircleX# + CosD(Angle#) * Radius#
Y# = CircleY# + SinD(Angle#) * Radius#

glBegin(GL_POINTS)
glVertex2f(X#, Y#)
glEnd()
next
SwapBuffers()


code lingkara dengan basic4gl : Disini